

Quill Rich Text Editor with Custom Toolbar and Character Limit

CodeMirror JSON Editor with Validation Gutter
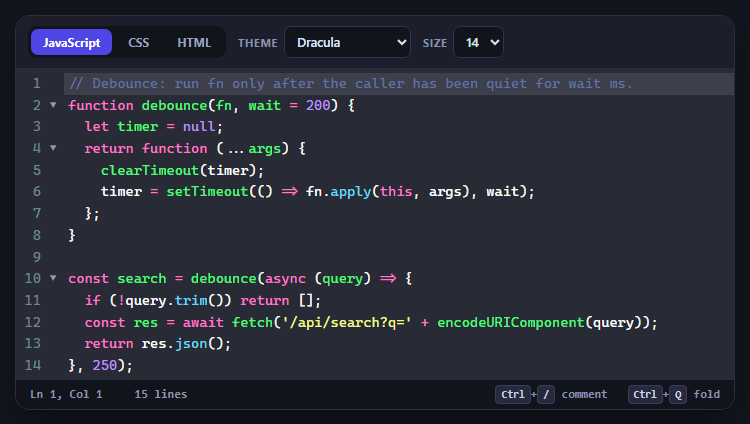
CodeMirror Code Editor with Line Numbers, Folding and Themes

Marked + DOMPurify Live Markdown Preview
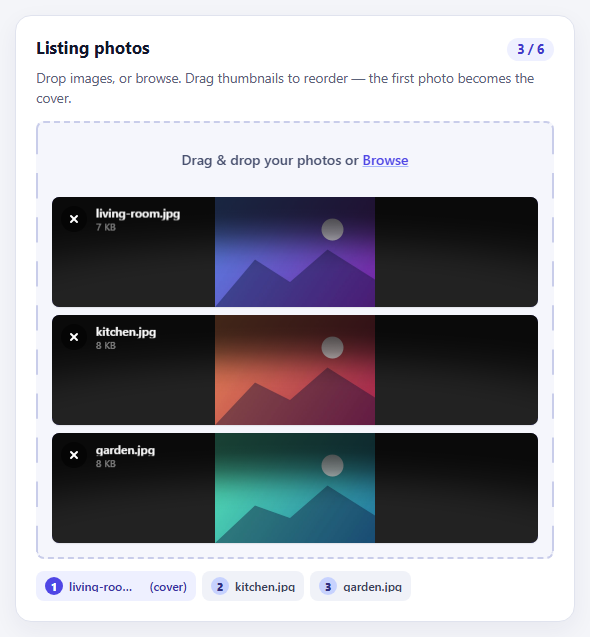
FilePond Image Upload with Preview and Reorder

Cropper.js Aspect-Ratio Presets for Social Posts
Segmented Control — Free HTML CSS JS Snippet
Segmented Control · Forms · Plain HTML, CSS & JS · Live preview
Copy & paste
Source Code
<div class="demo">
  <div class="group">
    <div class="seg" id="s1">
      <button class="seg-btn active" onclick="pick(this,'s1')">Monthly</button>
      <button class="seg-btn"        onclick="pick(this,'s1')">Quarterly</button>
      <button class="seg-btn"        onclick="pick(this,'s1')">Yearly</button>
      <div class="indicator" id="ind-s1"></div>
    </div>
  </div>

  <div class="group">
    <label class="group-label">View mode</label>
    <div class="seg seg-icons" id="s2">
      <button class="seg-btn active" onclick="pick(this,'s2')" title="Grid">
        <svg width="15" height="15" viewBox="0 0 24 24" fill="none" stroke="currentColor" stroke-width="2"><rect x="3" y="3" width="7" height="7"/><rect x="14" y="3" width="7" height="7"/><rect x="3" y="14" width="7" height="7"/><rect x="14" y="14" width="7" height="7"/></svg>
      </button>
      <button class="seg-btn" onclick="pick(this,'s2')" title="List">
        <svg width="15" height="15" viewBox="0 0 24 24" fill="none" stroke="currentColor" stroke-width="2" stroke-linecap="round"><line x1="8" y1="6" x2="21" y2="6"/><line x1="8" y1="12" x2="21" y2="12"/><line x1="8" y1="18" x2="21" y2="18"/><line x1="3" y1="6" x2="3.01" y2="6"/><line x1="3" y1="12" x2="3.01" y2="12"/><line x1="3" y1="18" x2="3.01" y2="18"/></svg>
      </button>
      <button class="seg-btn" onclick="pick(this,'s2')" title="Columns">
        <svg width="15" height="15" viewBox="0 0 24 24" fill="none" stroke="currentColor" stroke-width="2" stroke-linecap="round"><rect x="3" y="3" width="4" height="18" rx="1"/><rect x="10" y="3" width="4" height="18" rx="1"/><rect x="17" y="3" width="4" height="18" rx="1"/></svg>
      </button>
      <div class="indicator" id="ind-s2"></div>
    </div>
  </div>

  <div class="group">
    <label class="group-label">Size</label>
    <div class="seg seg-sm" id="s3">
      <button class="seg-btn active" onclick="pick(this,'s3')">XS</button>
      <button class="seg-btn" onclick="pick(this,'s3')">SM</button>
      <button class="seg-btn" onclick="pick(this,'s3')">MD</button>
      <button class="seg-btn" onclick="pick(this,'s3')">LG</button>
      <button class="seg-btn" onclick="pick(this,'s3')">XL</button>
      <div class="indicator" id="ind-s3"></div>
    </div>
  </div>
</div>
* { box-sizing: border-box; margin: 0; padding: 0; }
body { font-family: system-ui, sans-serif; background: #f8fafc; display: flex; align-items: center; justify-content: center; min-height: 100vh; padding: 20px; }
.demo { display: flex; flex-direction: column; gap: 20px; }
.group { display: flex; flex-direction: column; gap: 8px; }
.group-label { font-size: 12px; font-weight: 600; color: #64748b; }
.seg {
display: inline-flex; position: relative;
background: #e2e8f0; border-radius: 10px;
padding: 3px; gap: 0;
}
.seg-btn {
position: relative; z-index: 1;
padding: 7px 18px; font-size: 13px; font-weight: 600;
color: #64748b; background: none; border: none;
cursor: pointer; border-radius: 7px;
transition: color 0.2s; font-family: inherit;
white-space: nowrap;
}
.seg-btn.active { color: #1e293b; }
.seg-icons .seg-btn { padding: 8px 12px; }
.seg-sm .seg-btn { padding: 5px 12px; font-size: 11px; }
.indicator {
position: absolute; top: 3px; bottom: 3px;
background: #fff; border-radius: 7px;
box-shadow: 0 1px 4px rgba(0,0,0,0.12);
transition: left 0.22s cubic-bezier(0.4,0,0.2,1), width 0.22s cubic-bezier(0.4,0,0.2,1);
pointer-events: none;
}function pick(btn, segId) {
const seg = document.getElementById(segId);
seg.querySelectorAll('.seg-btn').forEach(b => b.classList.remove('active'));
btn.classList.add('active');
const ind = document.getElementById('ind-' + segId);
const segRect = seg.getBoundingClientRect();
const btnRect = btn.getBoundingClientRect();
ind.style.left = (btnRect.left - segRect.left) + 'px';
ind.style.width = btnRect.width + 'px';
}
['s1','s2','s3'].forEach(id => {
const active = document.querySelector('#' + id + ' .seg-btn.active');
if (active) pick(active, id);
});
window.addEventListener('resize', () => {
['s1','s2','s3'].forEach(id => {
const active = document.querySelector('#' + id + ' .seg-btn.active');
if (active) pick(active, id);
});
});Extend with AI
Take This Snippet Further With AI
The AI prompt for this one is for Patreon supporters ($3 a month), along with a site with no ads. Supporters enter the passcode once and it is remembered in this browser.
What's included
Features
About this UI Snippet
Segmented Control — Sliding Pill Indicator & Multiple Independent Instances
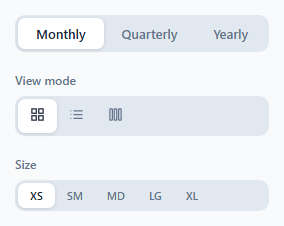
A segmented control is an iOS-style button group where one option is always selected and the active option is indicated by a sliding pill background. Used in view toggles (compare the tab bar), filter selectors, and settings groups.
The sliding pill
The same technique as the Animated Tabs snippet: pick(btn, segId) reads btn.offsetLeft and btn.offsetWidth and applies them to the indicator element's style.left and style.width. CSS transition: left 0.2s, width 0.2s animates the slide. The pill correctly adapts to different button label lengths.
Multiple independent instances
The segId parameter scopes the operation to a specific segmented control element. This allows multiple independent controls on the same page without event conflicts — each has its own indicator and active state.
Data binding
Each button has a data-value attribute that can be read after selection: document.querySelector('#my-seg .seg-btn.active').dataset.value returns the selected option.
The sliding pill indicator
The active indicator is a .pill div using position: absolute. On each button click, moveIndicator(btn) reads btn.offsetLeft and btn.offsetWidth — the actual pixel position and size of the clicked segment from the DOM. It then sets pill.style.left and pill.style.width to these values. CSS transition: left 0.2s, width 0.2s animates the pill sliding and resizing between segments. Since values are read at click time, the control handles any segment label length automatically with no CSS configuration.
Keyboard accessibility
The buttons are standard button elements — keyboard-accessible by default. For arrow key navigation matching native iOS segmented control behaviour, add a keydown listener: ArrowRight focuses and clicks the next segment; ArrowLeft focuses and clicks the previous. Tab moves between control groups; arrow keys move within a group.
Common production use cases
The segmented control works best for 2–4 mutually exclusive options that fit on one line. Common uses: List/Grid view toggle, Day/Week/Month time range picker, Bar/Line/Pie chart switcher, Ascending/Descending sort direction. Wire the active segment to a state variable and conditionally render the matching view component below.
The sliding pill indicator
The active indicator is a .pill div using position: absolute. On each button click, moveIndicator(btn) reads btn.offsetLeft and btn.offsetWidth — the actual pixel position and size of the clicked segment from the DOM. It then sets pill.style.left and pill.style.width to these values. CSS transition: left 0.2s, width 0.2s animates the pill sliding and resizing between segments. Since values are read at click time, the control handles any segment label length automatically with no CSS configuration.
Keyboard accessibility
The buttons are standard button elements — keyboard-accessible by default. For arrow key navigation matching native iOS segmented control behaviour, add a keydown listener: ArrowRight focuses and clicks the next segment; ArrowLeft focuses and clicks the previous. Tab moves between control groups; arrow keys move within a group.
Common production use cases
The segmented control works best for 2–4 mutually exclusive options that fit on one line. Common uses: List/Grid view toggle, Day/Week/Month time range picker, Bar/Line/Pie chart switcher, Ascending/Descending sort direction. Wire the active segment to a state variable and conditionally render the matching view component below.
Step by step
How to Use
- 1Click each segment optionClick any option in each of the three demo controls. The pill indicator slides smoothly to the clicked option.
- 2Update option labelsIn the HTML panel, change the button text inside each .seg-btn. The indicator auto-adapts to different label widths.
- 3Add a fourth optionAdd another .seg-btn button inside the .seg-wrap. The JS picks it up via querySelectorAll automatically.
- 4Read the selected valueAdd data-value attributes to each button. Read the selection: document.querySelector("#seg1 .seg-btn.active").dataset.value.
- 5Change indicator colourUpdate background: #fff on .seg-indicator in the CSS panel to match your brand.
- 6Export in your formatClick "HTML" for a standalone file, "JSX" for a React component, or "Tailwind" for a React + Tailwind version.
Real-world uses
Common Use Cases
Got questions?
Frequently Asked Questions
pick() reads btn.offsetLeft (position within the container) and btn.offsetWidth (button size). It sets indicator.style.left and .width to these pixel values. CSS transition: left 0.2s, width 0.2s animates between positions.
pick(btn, segId) scopes querySelectorAll and getElementById to document.getElementById(segId). This limits the active state changes to one control without affecting others on the same page.
After selection: const value = document.querySelector("#" + segId + " .seg-btn.active").dataset.value. Set a data-value attribute on each button matching the option value.
Add tabindex="0" to each button and a keydown handler that activates on Enter or Space. Add role="radiogroup" to the container and role="radio" aria-checked to each button.
Yes. Click "JSX" for a React component. Use useState for the active value. Apply active class based on value comparison. Use useRef on the indicator and active button to update indicator position in useEffect after value changes.
Segmented controls always show all options inline and are used for mutually exclusive choices within the same context. Tabs switch between different content panels. Segmented controls are more compact and suited for 2-5 options.