


Copy & paste
Source Code
<div class="scene">
  <div class="card">
    <div class="card-top">
      <div class="date-box">
        <span class="month">JUN</span>
        <span class="day">24</span>
      </div>
      <div class="category-badge">Design</div>
    </div>
    <div class="card-body">
      <h3>Frontend Design Summit 2026</h3>
      <div class="details">
        <div class="detail">
          <svg width="13" height="13" viewBox="0 0 24 24" fill="none" stroke="currentColor" stroke-width="2" stroke-linecap="round"><circle cx="12" cy="12" r="10"/><polyline points="12 6 12 12 16 14"/></svg>
          9:00 AM – 5:00 PM PST
        </div>
        <div class="detail">
          <svg width="13" height="13" viewBox="0 0 24 24" fill="none" stroke="currentColor" stroke-width="2" stroke-linecap="round"><path d="M21 10c0 7-9 13-9 13s-9-6-9-13a9 9 0 0 1 18 0z"/><circle cx="12" cy="10" r="3"/></svg>
          San Francisco, CA
        </div>
      </div>
      <div class="attendees">
        <div class="avs">
          <span style="background:#6366f1">A</span>
          <span style="background:#8b5cf6">B</span>
          <span style="background:#ec4899">C</span>
          <span style="background:#0ea5e9">D</span>
        </div>
        <span class="av-count">+248 attending</span>
      </div>
    </div>
    <div class="card-footer">
      <div class="price">$49 <span>/ ticket</span></div>
      <button class="rsvp-btn" onclick="this.textContent=this.textContent==='RSVP Now'?'✓ Reserved':'RSVP Now';this.classList.toggle('reserved')">RSVP Now</button>
    </div>
  </div>
</div>
* { box-sizing: border-box; margin: 0; padding: 0; }
body { font-family: system-ui, sans-serif; background: #f1f5f9; display: flex; align-items: center; justify-content: center; min-height: 100vh; padding: 20px; }
.card { background: #fff; border-radius: 18px; overflow: hidden; width: 300px; box-shadow: 0 4px 24px rgba(0,0,0,0.08); }
.card-top { background: linear-gradient(135deg,#6366f1,#8b5cf6); padding: 20px; display: flex; justify-content: space-between; align-items: flex-start; }
.date-box { display: flex; flex-direction: column; align-items: center; background: rgba(255,255,255,0.2); border-radius: 10px; padding: 10px 16px; backdrop-filter: blur(8px); }
.month { font-size: 11px; font-weight: 700; color: rgba(255,255,255,0.8); text-transform: uppercase; letter-spacing: 1px; }
.day { font-size: 28px; font-weight: 800; color: #fff; line-height: 1.1; }
.category-badge { background: rgba(255,255,255,0.2); color: #fff; font-size: 11px; font-weight: 700; padding: 4px 10px; border-radius: 20px; backdrop-filter: blur(8px); }
.card-body { padding: 18px; display: flex; flex-direction: column; gap: 12px; }
h3 { font-size: 15px; font-weight: 700; color: #1e293b; line-height: 1.4; }
.details { display: flex; flex-direction: column; gap: 6px; }
.detail { display: flex; align-items: center; gap: 6px; font-size: 12px; color: #64748b; }
.attendees { display: flex; align-items: center; gap: 8px; }
.avs { display: flex; }
.avs span { width: 26px; height: 26px; border-radius: 50%; display: flex; align-items: center; justify-content: center; font-size: 10px; font-weight: 700; color: #fff; margin-left: -6px; border: 2px solid #fff; }
.avs span:first-child { margin-left: 0; }
.av-count { font-size: 12px; color: #64748b; font-weight: 500; }
.card-footer { display: flex; align-items: center; justify-content: space-between; padding: 14px 18px; border-top: 1px solid #f1f5f9; }
.price { font-size: 18px; font-weight: 800; color: #1e293b; }
.price span { font-size: 12px; color: #94a3b8; font-weight: 400; }
.rsvp-btn { padding: 8px 18px; background: #6366f1; color: #fff; border: none; border-radius: 8px; font-size: 13px; font-weight: 600; cursor: pointer; font-family: inherit; transition: all 0.15s; }
.rsvp-btn:hover { background: #4f46e5; }
.rsvp-btn.reserved { background: #16a34a; }Extend with AI
Take This Snippet Further With AI
The AI prompt for this one is for Patreon supporters ($3 a month), along with a site with no ads. Supporters enter the passcode once and it is remembered in this browser.
What's included
Features
About this UI Snippet
Event Card — Gradient Header, Date Badge & Overlapping Avatar Stack
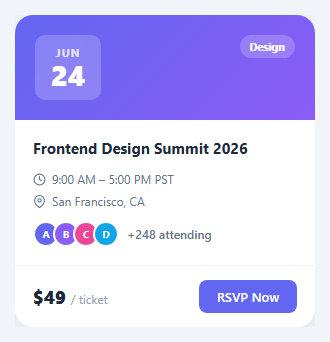
An event card displays all key information about an upcoming event — date, time, location, attendees, and an RSVP / add-to-calendar action. Used in event platforms, community apps, calendar widgets, and conference landing pages.
The date badge
The gradient header contains a .date-box with position: absolute — a white semi-transparent badge showing the day number large and month small in a flex column. The header gradient provides the visual background for the date.
Overlapping avatar stack
Each attendee avatar has margin-left: -8px and border: 2px solid #fff — the negative margin creates the overlapping effect while the white border separates each circle. A +N text element follows the last avatar.
Metadata row
Location and time are displayed in a flex row with icon + text pairs, using a coloured emoji icon for visual scanning speed.
RSVP state management
The RSVP button toggles between two states: "RSVP" (outline style) and "✓ Going" (filled green). A click handler toggles a .going class on the button, which changes the background, border, and text via CSS. The attendee count updates simultaneously to reflect the new registration. This is the optimistic update pattern — update the UI immediately, then sync with the API.
The gradient header
The card header uses background: linear-gradient with an overlay pattern. The gradient provides visual interest for the date badge and event image placeholder. Replace the gradient with a real event cover image: background: url("event.jpg") center/cover — the date badge positions correctly over any background due to its absolute positioning and semi-transparent white background.
The capacity indicator
A small capacity bar below the attendee row shows percentage-full status. If an event is nearly full, this visual cue creates urgency. The bar uses the same width percentage technique as progress bars: width: capacityPct + "%".
Accessibility for the date badge
The date information is visually clear in the badge but should also be available to screen readers as text inside the card. Include an aria-label on the card or a visually hidden <time> element with datetime="2026-06-15" so assistive technology can announce the event date correctly.
Combining multiple event cards
For an events listing page, render event cards in a CSS grid: display: grid; grid-template-columns: repeat(auto-fill, minmax(300px, 1fr)); gap: 20px. Each card is self-contained and the grid automatically adapts from 3 columns on desktop to 1 on mobile. Add a filter row above for category chips (Music, Tech, Sports) that filter the displayed cards using the same .hidden class pattern as the gallery category filter.
Step by step
How to Use
- 1Load the snippetClick "Event Card" in the sidebar. The preview shows the card with gradient header, date badge, attendee stack, and RSVP button.
- 2Update event detailsIn the HTML panel, change the date numbers, month, event title, location, time, and description.
- 3Update attendee avatarsChange the avatar initials and background colours in the .attendee divs.
- 4Change the gradientUpdate the linear-gradient on .card-top in the CSS panel to match your event brand.
- 5Change the RSVP buttonUpdate the button text and add a JS click handler for the RSVP action.
- 6Export in your formatClick "HTML" for a standalone file, "JSX" for a React component, or "Tailwind" for a React + Tailwind version.
Real-world uses
Common Use Cases
Got questions?
Frequently Asked Questions
The .card-top header has position: relative. The .date-box has position: absolute; top: 16px; right: 20px — placed in the top-right corner of the gradient. The semi-transparent white background (rgba(255,255,255,0.2)) makes it readable over any gradient colour while maintaining the translucent aesthetic.
Each .attendee div has margin-left: -8px (except the first which has margin-left: 0). This pulls each avatar 8px under the previous one, creating the overlap. border: 2px solid #fff creates a white gap between overlapping circles, giving each one visual separation.
Copy an .attendee div, update the initials and background-color, and paste it before the +N count element. Update the +N number to reflect the total attendees beyond what is shown. Keep 3-4 visible avatars — showing more than 4 looks cluttered on a compact card.
Add href to the button's anchor or an onclick that calls your booking API: btn.onclick = () => fetch("/api/rsvp", { method: "POST", body: JSON.stringify({ eventId }) }). After successful RSVP, change the button text to Registered ✓ and update its style with a green outline instead of a filled background.
Add a .sold-out or .cancelled class to .card. Override RSVP button: disabled with opacity: 0.5 and changed text. For cancelled events, add a banner at the top of the card: position: absolute; top: 0; left: 0; right: 0; background: #ef4444; color: #fff; text-align: center; padding: 4px; font-size: 12px; font-weight: 700.
Yes. Create an EventCard component accepting event, attendees, and isRegistered props. Derive the card content from props: the gradient from event.colour, date from event.date, title from event.name. Map attendees array to avatar elements. Wire the RSVP button to an onRSVP callback prop.