



Step Line Chart — HTML CSS JS Stepped Line (No Lib)
Step Line Chart · Charts · Plain HTML, CSS & JS · Live preview
Copy & paste
Source Code
<div class="sl-card">
  <div class="sl-head">
    <h3>Plan price changes</h3>
    <div class="sl-modes">
      <button type="button" class="sl-mode sl-on" data-mode="after">Step</button>
      <button type="button" class="sl-mode" data-mode="line">Line</button>
    </div>
  </div>
  <svg class="sl-svg" id="slSvg" viewBox="0 0 380 200" role="img" aria-label="Step line chart"></svg>
  <div class="sl-x" id="slX"></div>
  <div class="sl-tip" id="slTip" hidden></div>
</div>*{box-sizing:border-box;margin:0;padding:0}
body{font-family:system-ui,-apple-system,sans-serif;background:#f1f5f9;min-height:100vh;display:flex;align-items:center;justify-content:center;padding:24px}
.sl-card{position:relative;background:#fff;border-radius:16px;padding:22px;width:100%;max-width:460px;box-shadow:0 18px 44px rgba(15,23,42,.08)}
.sl-head{display:flex;align-items:center;justify-content:space-between;margin-bottom:14px}
.sl-head h3{font-size:16px;font-weight:800;color:#0f172a}
.sl-modes{display:flex;background:#f1f5f9;border-radius:9px;padding:3px}
.sl-mode{border:none;background:none;border-radius:7px;padding:5px 12px;font-size:12px;font-weight:700;color:#64748b;cursor:pointer;font-family:inherit}
.sl-mode.sl-on{background:#fff;color:#0f172a;box-shadow:0 1px 3px rgba(15,23,42,.1)}
.sl-svg{width:100%;height:auto;display:block}
.sl-grid{stroke:#eef2f7;stroke-width:1}
.sl-area{fill:rgba(99,102,241,.1)}
.sl-line{fill:none;stroke:#6366f1;stroke-width:2.5;stroke-linejoin:round;stroke-linecap:round;transition:none}
.sl-dot{fill:#fff;stroke:#6366f1;stroke-width:2;cursor:pointer}
.sl-x{display:flex;justify-content:space-between;margin-top:6px;padding:0 2px;font-size:10.5px;font-weight:700;color:#94a3b8}
.sl-tip{position:absolute;pointer-events:none;background:#0f172a;color:#fff;font-size:12px;font-weight:700;padding:6px 10px;border-radius:8px;transform:translate(-50%,-130%);white-space:nowrap;z-index:5}
.sl-tip[hidden]{display:none}var LABELS = ['Jan','Feb','Mar','Apr','May','Jun','Jul','Aug'];
var DATA = [9, 9, 12, 12, 12, 15, 15, 19];
var svg = document.getElementById('slSvg');
var tip = document.getElementById('slTip');
var card = document.querySelector('.sl-card');
var SVGNS = 'http://www.w3.org/2000/svg';
var W = 380, H = 200, PAD = 30;
var mode = 'after';
function px(i) { return PAD + i * (W - PAD * 2) / (LABELS.length - 1); }
function py(v, max) { return (H - PAD) - (v / max) * (H - PAD * 2); }
// Build the path. 'line' connects points directly; 'after' holds each value
// then jumps at the next x (a step that changes AFTER the point).
function buildPath(max) {
var d = '';
DATA.forEach(function (v, i) {
var x = px(i), y = py(v, max);
if (i === 0) { d += 'M' + x + ',' + y; return; }
if (mode === 'after') {
var prevY = py(DATA[i - 1], max);
d += ' L' + x + ',' + prevY + ' L' + x + ',' + y; // horizontal then vertical
} else {
d += ' L' + x + ',' + y;
}
});
return d;
}
function el(n, a) { var e = document.createElementNS(SVGNS, n); for (var k in a) e.setAttribute(k, a[k]); return e; }
function render() {
var max = Math.ceil(Math.max.apply(null, DATA) / 5) * 5;
svg.innerHTML = '';
for (var g = 0; g <= 4; g++) {
var gy = PAD + g * (H - PAD * 2) / 4;
svg.appendChild(el('line', { class: 'sl-grid', x1: PAD, y1: gy, x2: W - PAD, y2: gy }));
}
var d = buildPath(max);
// Filled area under the path.
svg.appendChild(el('path', { class: 'sl-area', d: d + ' L' + px(DATA.length - 1) + ',' + (H - PAD) + ' L' + px(0) + ',' + (H - PAD) + ' Z' }));
svg.appendChild(el('path', { class: 'sl-line', d: d }));
DATA.forEach(function (v, i) {
var dot = el('circle', { class: 'sl-dot', cx: px(i), cy: py(v, max), r: 3.5 });
dot.dataset.label = LABELS[i]; dot.dataset.value = v;
svg.appendChild(dot);
});
document.getElementById('slX').innerHTML = LABELS.map(function (l) { return '<span>' + l + '</span>'; }).join('');
}
svg.addEventListener('mousemove', function (e) {
var dot = e.target.closest('.sl-dot');
if (!dot) { tip.hidden = true; return; }
var r = card.getBoundingClientRect();
tip.innerHTML = dot.dataset.label + ': <b>$' + dot.dataset.value + '</b>';
tip.style.left = (e.clientX - r.left) + 'px';
tip.style.top = (e.clientY - r.top) + 'px';
tip.hidden = false;
});
svg.addEventListener('mouseleave', function () { tip.hidden = true; });
document.querySelectorAll('.sl-mode').forEach(function (b) {
b.addEventListener('click', function () {
mode = b.dataset.mode;
document.querySelectorAll('.sl-mode').forEach(function (x) { x.classList.toggle('sl-on', x === b); });
render();
});
});
render();Extend with AI
Take This Snippet Further With AI
The AI prompt for this one is for Patreon supporters ($3 a month, 7 days free), along with a site with no ads. Supporters enter the passcode once and it is remembered in this browser.
What's included
Features
About this UI Snippet
Step Line Chart — Staircase Lines for Values That Hold Then Jump
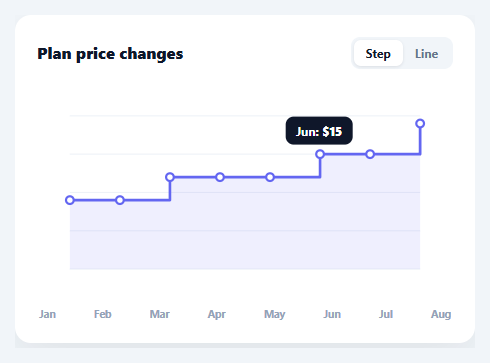
A step line chart draws horizontal-then-vertical "staircase" segments instead of diagonal lines, which is the *correct* way to show values that stay constant until they suddenly change — a price that holds for months then jumps, an inventory level, a feature flag, a thermostat setpoint. A normal line chart would imply a gradual slope between readings that never actually happened. This snippet builds a step line chart in plain HTML, CSS, SVG, and vanilla JavaScript, with a toggle between step and straight-line modes, a filled area, and tooltips — no charting library.
Why steps, not slopes
The semantic point is everything here. If your $9 plan became $12 in March, the price didn't gradually rise through $10 and $11 — it was $9, then instantly $12. A diagonal line lies about the in-between values; a step truthfully shows the value held flat and then jumped. Step charts are the right choice for any quantity that changes discretely and holds between changes, and getting this distinction right is the reason to reach for one.
Building the staircase path
buildPath constructs the SVG path differently per mode. In line mode it simply draws L segments point-to-point. In step mode (after) it draws, for each point, a horizontal segment at the *previous* value's height across to the new x, then a vertical segment up or down to the new value — producing the staircase where each value holds until the next reading, then steps. This "step-after" variant changes the value at each data point; the same idea inverted gives "step-before." It's a few lines of path-building that completely change the chart's meaning.
A toggle to compare
A segmented control flips between Step and Line so you can see the same data both ways — useful for understanding when a step chart is the honest representation. Both modes share the same scaling, dots, and filled area, so only the connecting path changes.
Area fill and point markers
The path is closed down to the baseline and filled with a translucent band, the standard way to add an area under a line in SVG (it makes magnitude easier to read). White-filled dots mark each data point and carry the label and value for tooltips, shown at the cursor via getBoundingClientRect.
Data-driven and drop-in
The chart renders from a LABELS array and a DATA array, with the y-scale rounded to a clean step above the maximum. Swap in your own discretely-changing series — prices, tiers, counts, states — and it draws the staircase. It's a clear reference for building stepped SVG paths and for when step interpolation is the truthful choice over a smooth line.
Step by step
How to Use
- 1Paste HTML, CSS, and JSA step line chart renders showing a plan price holding then jumping over eight months.
- 2Toggle Step / LineSwitch modes to compare the staircase against a straight-line interpolation of the same data.
- 3Hover a pointSee each point's label and value in a tooltip.
- 4Swap in your dataReplace LABELS and DATA with your own discretely-changing series.
- 5Choose the right modeUse step mode for values that hold then jump; line mode for continuously-changing data.
- 6Wire to an APIFetch your series, assign to DATA, and call render().
Real-world uses
Common Use Cases
Got questions?
Frequently Asked Questions
Use a step chart whenever the value changes discretely and holds constant between changes — prices, inventory, rates, settings, tiers. A straight line between two readings implies the value moved gradually through the in-between numbers, which is false for such data. The staircase truthfully shows the value held flat, then jumped at the moment it actually changed.
For each point after the first, the path draws a horizontal segment at the previous value's height across to the new x-position, then a vertical segment to the new value — so the line holds flat then jumps. This is the "step-after" variant (value changes at each data point). Line mode instead draws a direct L segment between points. Only the path construction differs; scaling and markers are shared.
Step-after (used here) holds the previous value until it reaches the next data point, then steps to the new value — the change happens at the point. Step-before steps to the new value first, then holds it across to the point — the change happens before the point. Which is correct depends on your data's semantics; you can swap the order of the horizontal/vertical segments in buildPath to switch.
The same path used for the line is extended down to the baseline at the last x, across to the first x at the baseline, and closed (Z), forming a filled shape under the line. It's painted with a translucent fill behind the stroked line. Closing a line path to the baseline is the standard SVG technique for an area chart, and it works identically for stepped or straight paths.
In React, hold the data and mode in useState and render the path/dots from the computed values (or run render() in a useEffect with a ref); in Vue, use a computed path string with refs; in Angular, a getter with ViewChild. The buildPath() step logic and scaling are framework-agnostic — only the mode state and rendering move into the framework.