

Quill Rich Text Editor with Custom Toolbar and Character Limit

CodeMirror JSON Editor with Validation Gutter
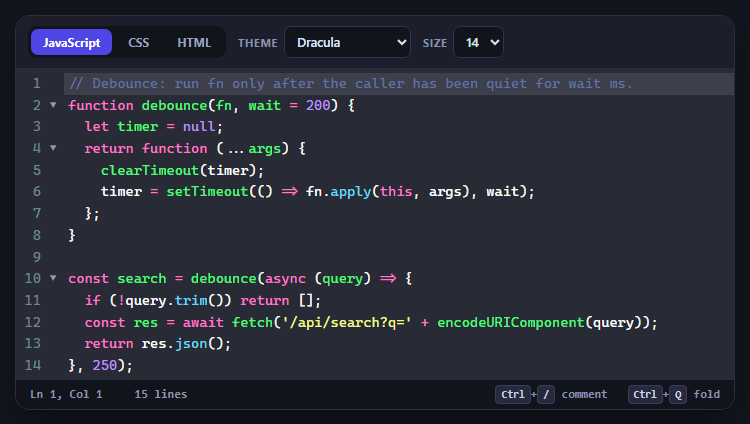
CodeMirror Code Editor with Line Numbers, Folding and Themes

Marked + DOMPurify Live Markdown Preview
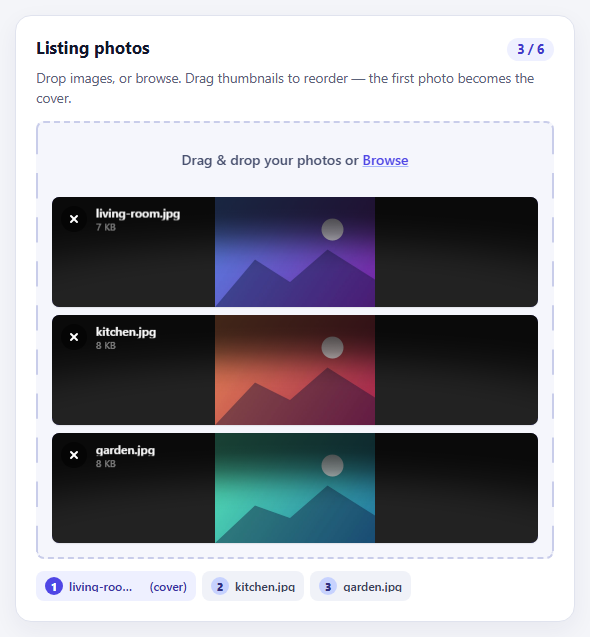
FilePond Image Upload with Preview and Reorder

Cropper.js Aspect-Ratio Presets for Social Posts
Contact Form — Floating Labels & Validation HTML CSS JS
Contact Form · Forms · Plain HTML, CSS & JS · Live preview
Copy & paste
Source Code
<div class="page">
  <div class="card">
    <div class="card-left">
      <h2 class="form-title">Get in Touch</h2>
      <p class="form-sub">Fill in the form and I'll get back to you within 24 hours.</p>
      <div class="contact-details">
        <div class="detail-item">
          <div class="detail-icon">
            <svg width="14" height="14" viewBox="0 0 24 24" fill="none" stroke="currentColor" stroke-width="2" stroke-linecap="round"><path d="M4 4h16c1.1 0 2 .9 2 2v12c0 1.1-.9 2-2 2H4c-1.1 0-2-.9-2-2V6c0-1.1.9-2 2-2z"/><polyline points="22,6 12,13 2,6"/></svg>
          </div>
          <div><p class="detail-label">Email</p><p class="detail-val">[email protected]</p></div>
        </div>
        <div class="detail-item">
          <div class="detail-icon">
            <svg width="14" height="14" viewBox="0 0 24 24" fill="none" stroke="currentColor" stroke-width="2" stroke-linecap="round"><path d="M21 10c0 7-9 13-9 13s-9-6-9-13a9 9 0 0 1 18 0z"/><circle cx="12" cy="10" r="3"/></svg>
          </div>
          <div><p class="detail-label">Location</p><p class="detail-val">New Delhi, India</p></div>
        </div>
        <div class="detail-item">
          <div class="detail-icon">
            <svg width="14" height="14" viewBox="0 0 24 24" fill="none" stroke="currentColor" stroke-width="2" stroke-linecap="round"><circle cx="12" cy="12" r="10"/><polyline points="12 6 12 12 16 14"/></svg>
          </div>
          <div><p class="detail-label">Response time</p><p class="detail-val">Within 24 hours</p></div>
        </div>
      </div>
      <div class="social-row">
        <a href="#" class="soc-btn" aria-label="X (Twitter)"><svg width="13" height="13" viewBox="0 0 24 24" fill="currentColor"><path d="M18.244 2.25h3.308l-7.227 8.26 8.502 11.24H16.17l-4.714-6.231-5.401 6.231H2.744l7.73-8.835L1.254 2.25H8.08l4.253 5.622 5.911-5.622Zm-1.161 17.52h1.833L7.084 4.126H5.117z"/></svg></a>
        <a href="#" class="soc-btn" aria-label="LinkedIn"><svg width="13" height="13" viewBox="0 0 24 24" fill="currentColor"><path d="M16 8a6 6 0 0 1 6 6v7h-4v-7a2 2 0 0 0-2-2 2 2 0 0 0-2 2v7h-4v-7a6 6 0 0 1 6-6zM2 9h4v12H2z"/><circle cx="4" cy="4" r="2"/></svg></a>
        <a href="#" class="soc-btn" aria-label="GitHub"><svg width="13" height="13" viewBox="0 0 24 24" fill="currentColor"><path d="M9 19c-5 1.5-5-2.5-7-3m14 6v-3.87a3.37 3.37 0 0 0-.94-2.61c3.14-.35 6.44-1.54 6.44-7A5.44 5.44 0 0 0 20 4.77 5.07 5.07 0 0 0 19.91 1S18.73.65 16 2.48a13.38 13.38 0 0 0-7 0C6.27.65 5.09 1 5.09 1A5.07 5.07 0 0 0 5 4.77a5.44 5.44 0 0 0-1.5 3.78c0 5.42 3.3 6.61 6.44 7A3.37 3.37 0 0 0 9 18.13V22"/></svg></a>
      </div>
    </div>

    <form class="form" id="form" novalidate>
      <div class="row-2">
        <div class="field" id="field-name">
          <label class="label" for="name">Full Name <span class="req">*</span></label>
          <input class="input" id="name" type="text" placeholder="John Smith" autocomplete="name" />
          <p class="field-error" id="err-name"></p>
        </div>
        <div class="field" id="field-email">
          <label class="label" for="email">Email <span class="req">*</span></label>
          <input class="input" id="email" type="email" placeholder="[email protected]" autocomplete="email" />
          <p class="field-error" id="err-email"></p>
        </div>
      </div>
      <div class="field" id="field-subject">
        <label class="label" for="subject">Subject <span class="req">*</span></label>
        <div class="select-wrap">
          <select class="input select" id="subject">
            <option value="">Select a topic…</option>
            <option>General Enquiry</option>
            <option>Project Collaboration</option>
            <option>Bug Report</option>
            <option>Feature Request</option>
            <option>Other</option>
          </select>
          <svg class="select-arrow" width="12" height="12" viewBox="0 0 24 24" fill="none" stroke="currentColor" stroke-width="2.5" stroke-linecap="round"><polyline points="6 9 12 15 18 9"/></svg>
        </div>
        <p class="field-error" id="err-subject"></p>
      </div>
      <div class="field" id="field-message">
        <label class="label" for="message">Message <span class="req">*</span></label>
        <textarea class="input textarea" id="message" rows="4" placeholder="Tell me about your project or question…"></textarea>
        <div class="char-count"><span id="charCount">0</span> / 500</div>
        <p class="field-error" id="err-message"></p>
      </div>
      <div class="field field-check">
        <label class="check-label">
          <input type="checkbox" class="check" id="privacy" />
          <span class="check-box"></span>
          I agree to the <a href="#" class="inline-link">Privacy Policy</a>
        </label>
        <p class="field-error" id="err-privacy"></p>
      </div>
      <button type="submit" class="submit-btn" id="submitBtn">
        <span class="btn-label">Send Message</span>
        <svg width="14" height="14" viewBox="0 0 24 24" fill="none" stroke="currentColor" stroke-width="2.5" stroke-linecap="round"><line x1="22" y1="2" x2="11" y2="13"/><polygon points="22 2 15 22 11 13 2 9 22 2"/></svg>
        <span class="btn-spin" aria-hidden="true"></span>
      </button>
      <div class="success-banner" id="successBanner" hidden>
        <svg width="16" height="16" viewBox="0 0 24 24" fill="none" stroke="#10b981" stroke-width="2.5" stroke-linecap="round"><polyline points="20 6 9 17 4 12"/></svg>
        Message sent! I'll reply within 24 hours.
      </div>
    </form>
  </div>
</div>*{box-sizing:border-box;margin:0;padding:0}
body{font-family:system-ui,sans-serif;background:#f0f4ff;min-height:100vh;display:flex;align-items:center;justify-content:center;padding:20px}
.card{background:#fff;border-radius:22px;display:flex;gap:0;overflow:hidden;max-width:760px;width:100%;box-shadow:0 20px 60px rgba(99,102,241,.1)}
/* Left panel */
.card-left{background:linear-gradient(145deg,#312e81,#4c1d95);padding:32px 28px;display:flex;flex-direction:column;gap:24px;min-width:220px;max-width:240px;flex-shrink:0}
.form-title{font-size:20px;font-weight:800;color:#fff}
.form-sub{font-size:12px;color:#a5b4fc;line-height:1.6}
.contact-details{display:flex;flex-direction:column;gap:14px}
.detail-item{display:flex;align-items:flex-start;gap:10px}
.detail-icon{width:30px;height:30px;background:rgba(255,255,255,.1);border-radius:8px;display:flex;align-items:center;justify-content:center;color:#c4b5fd;flex-shrink:0;margin-top:1px}
.detail-label{font-size:9.5px;font-weight:700;text-transform:uppercase;letter-spacing:.06em;color:#8b5cf6;margin-bottom:1px}
.detail-val{font-size:12px;color:#e9d5ff;font-weight:500}
.social-row{display:flex;gap:8px;margin-top:auto}
.soc-btn{width:32px;height:32px;background:rgba(255,255,255,.1);border:1px solid rgba(255,255,255,.15);border-radius:8px;display:flex;align-items:center;justify-content:center;color:#c4b5fd;text-decoration:none;transition:background .15s}
.soc-btn:hover{background:rgba(255,255,255,.2)}
/* Form */
.form{padding:28px 28px;display:flex;flex-direction:column;gap:16px;flex:1}
.row-2{display:grid;grid-template-columns:1fr 1fr;gap:14px}
.field{display:flex;flex-direction:column;gap:5px}
.label{font-size:12px;font-weight:600;color:#374151}
.req{color:#ef4444}
.input{padding:10px 13px;font-size:13px;border:1.5px solid #e5e7eb;border-radius:10px;outline:none;color:#111827;background:#f9fafb;transition:border-color .2s,background .2s;font-family:inherit;width:100%}
.input:focus{border-color:#6366f1;background:#fff}
.input.is-error{border-color:#ef4444}
.textarea{resize:vertical;min-height:90px}
.select-wrap{position:relative}
.select{appearance:none;cursor:pointer}
.select-arrow{position:absolute;right:12px;top:50%;transform:translateY(-50%);pointer-events:none;color:#9ca3af}
.char-count{font-size:10px;color:#9ca3af;text-align:right}
.field-error{font-size:11px;color:#ef4444;min-height:14px}
/* Checkbox */
.field-check{flex-direction:row;align-items:center;gap:10px;flex-wrap:wrap}
.check-label{display:flex;align-items:center;gap:8px;cursor:pointer;font-size:12px;color:#6b7280}
.check{position:absolute;opacity:0;width:0;height:0}
.check-box{width:16px;height:16px;border:1.5px solid #d1d5db;border-radius:4px;display:inline-flex;align-items:center;justify-content:center;flex-shrink:0;transition:background .15s,border-color .15s}
.check:checked+.check-box{background:#6366f1;border-color:#6366f1}
.check:checked+.check-box::after{content:'✓';font-size:10px;color:#fff;font-weight:700}
.inline-link{color:#6366f1;text-decoration:none;font-weight:600}
.inline-link:hover{text-decoration:underline}
/* Submit */
.submit-btn{display:flex;align-items:center;justify-content:center;gap:8px;width:100%;padding:13px;background:linear-gradient(135deg,#6366f1,#8b5cf6);color:#fff;font-size:14px;font-weight:700;border:none;border-radius:12px;cursor:pointer;transition:opacity .2s,transform .15s;position:relative;overflow:hidden;font-family:inherit}
.submit-btn:hover{opacity:.92;transform:translateY(-1px)}
.submit-btn.loading .btn-label,.submit-btn.loading svg{opacity:0}
.submit-btn.loading .btn-spin{opacity:1}
.btn-spin{position:absolute;width:18px;height:18px;border:2.5px solid rgba(255,255,255,.3);border-top-color:#fff;border-radius:50%;animation:spin .7s linear infinite;opacity:0;transition:opacity .15s}
@keyframes spin{to{transform:rotate(360deg)}}
.success-banner{display:flex;align-items:center;gap:8px;padding:12px 16px;background:#ecfdf5;border:1px solid #a7f3d0;border-radius:10px;font-size:13px;color:#065f46;font-weight:500;animation:slideIn .4s ease}
@keyframes slideIn{from{opacity:0;transform:translateY(-8px)}to{opacity:1;transform:none}}
@media(max-width:600px){.card{flex-direction:column}.card-left{max-width:100%;min-width:0;padding:24px}.row-2{grid-template-columns:1fr}}const form = document.getElementById('form');
const fields = {
name: { el: document.getElementById('name'), err: document.getElementById('err-name') },
email: { el: document.getElementById('email'), err: document.getElementById('err-email') },
subject: { el: document.getElementById('subject'), err: document.getElementById('err-subject') },
message: { el: document.getElementById('message'), err: document.getElementById('err-message') },
privacy: { el: document.getElementById('privacy'), err: document.getElementById('err-privacy') },
};
const submitBtn = document.getElementById('submitBtn');
const successBanner = document.getElementById('successBanner');
const charCount = document.getElementById('charCount');
// Char counter
fields.message.el.addEventListener('input', e => {
const len = e.target.value.length;
charCount.textContent = len;
if(len > 500){ fields.message.el.value = e.target.value.slice(0,500); charCount.textContent = 500; }
});
function validate(){
let ok = true;
const setErr = (key, msg) => {
fields[key].err.textContent = msg;
fields[key].el.classList.toggle('is-error', !!msg);
if(msg) ok = false;
};
const v = k => fields[k].el.value.trim();
setErr('name', !v('name') ? 'Full name is required.' : '');
setErr('email', !v('email') ? 'Email is required.' : !/^[^s@]+@[^s@]+.[^s@]+$/.test(v('email')) ? 'Enter a valid email.' : '');
setErr('subject', !v('subject') ? 'Please select a topic.' : '');
setErr('message', !v('message') ? 'Message is required.' : v('message').length < 10 ? 'Message is too short (min 10 chars).' : '');
setErr('privacy', !fields.privacy.el.checked ? 'Please agree to the privacy policy.' : '');
return ok;
}
// Clear errors on input
Object.values(fields).forEach(({el, err}) => {
el.addEventListener(el.type === 'checkbox' ? 'change' : 'input', () => {
err.textContent = '';
el.classList.remove('is-error');
});
});
form.addEventListener('submit', async e => {
e.preventDefault();
if(!validate()) return;
submitBtn.classList.add('loading');
submitBtn.disabled = true;
await new Promise(r => setTimeout(r, 1500));
submitBtn.classList.remove('loading');
form.reset();
charCount.textContent = '0';
successBanner.hidden = false;
successBanner.removeAttribute('hidden');
setTimeout(() => { successBanner.hidden = true; submitBtn.disabled = false; }, 5000);
});Extend with AI
Take This Snippet Further With AI
The AI prompt for this one is for Patreon supporters ($3 a month, 7 days free), along with a site with no ads. Supporters enter the passcode once and it is remembered in this browser.
What's included
Features
input — no full-form re-validation needed for corrections.<select> with appearance: none + custom SVG arrow — preserves keyboard navigation and native option list while giving full visual control.maxlength attribute..check-box div with :checked + .check-box selector — indigo fill and ✓ checkmark. Keyboard and screen reader accessible..loading class fades out label/icon and fades in spinner — button stays the same size, preventing layout shift during the async delay.translateY(-8px) → 0) after successful submission. Auto-hides after 5 seconds and re-enables the form.About this UI Snippet
Contact Form — Field-Level Validation, Character Counter & Two-Panel Layout

A contact form is often the most critical conversion element on a freelancer or agency website, yet most implementations lack the validation, loading states, and success feedback that users expect. This snippet builds a production-quality two-panel contact form: a purple contact details panel on the left, and a validated form on the right with name, email, subject dropdown, message textarea with character counter, privacy checkbox, loading button, and an animated success banner.
Contact forms must handle five key UX concerns simultaneously: preventing empty submission, validating email format, providing immediate per-field feedback, communicating async submission state, and confirming success clearly. This snippet solves all five.
Per-field validation with immediate error clearing
Each field has a sibling <p class="field-error"> element that displays the validation error. The validate() function runs on submit and populates each error paragraph with a message (or clears it if valid). The is-error class adds a red border to the field. Crucially, each field's input event (or change for the checkbox) clears the error immediately — users get confirmation that their correction is accepted without waiting for re-submit.
Subject dropdown with custom arrow
The subject is a <select> element with appearance: none to remove the browser's native arrow. A custom SVG chevron is absolutely positioned over the right side. This technique gives full control over the select's visual appearance while preserving its native focus, keyboard navigation, and option list behaviour.
Character counter for the textarea
The message textarea has a maxlength-style counter implemented in JavaScript: the input event updates charCount.textContent and enforces the 500-character limit by slicing e.target.value. This is more user-friendly than a native maxlength attribute because the counter shows remaining characters rather than silently refusing input.
Privacy checkbox with custom styling
The privacy checkbox uses position: absolute; opacity: 0 to hide the native input while keeping it focusable. A sibling .check-box div shows the visual state via :checked + .check-box CSS — filling with indigo and showing a ✓ character when checked. This is the standard CSS-only custom checkbox pattern that works with keyboard, mouse, and screen reader.
Loading and success states
The submit button switches to a spinner during the async call (same CSS opacity technique as the newsletter form). On success, the form resets to empty, a green success banner slides in from above, and after 5 seconds the banner hides and the button re-enables for another submission. Pair with a toast notification if you want a site-wide confirmation that persists across navigation.
Step by step
How to Use
- 1Paste HTML, CSS, and JSA two-panel card renders — purple left panel with contact details and social links, white right panel with the full form.
- 2Try submitting emptyClick "Send Message" without filling anything — all five fields show inline error messages and red borders simultaneously.
- 3Fill in the form and type in the messageThe character counter below the textarea updates with each keystroke. Errors clear field-by-field as you fill them in correctly.
- 4Check the privacy box and submitA loading spinner appears in the button for 1.5 seconds. Then the form resets and a green success banner slides in.
- 5Connect your backendReplace the
setTimeoutin JS with a realfetchcall to your API, Formspree endpoint, or email service. Handle errors by re-enabling the button and callingvalidate()with a server error message. - 6Update contact detailsEdit the email, location, and response time in the HTML left panel. Swap the social links to your actual profiles. Change the gradient colours in CSS
.card-left.
Real-world uses
Common Use Cases
Got questions?
Frequently Asked Questions
Set action="https://formspree.io/f/{your-id}" and method="POST" on the form, and remove the JS submit handler. Or keep the JS handler and use fetch('https://formspree.io/f/{id}', { method:'POST', body: new FormData(form), headers:{Accept:'application/json'} }).
Add <div class="field"><label>Phone</label><input type="tel" class="input" /></div> in the form HTML. Validation: /^[+\d\s\-\(\)]{7,}$/.test(value). Phone is typically optional, so no required check.
Use useState for { values, errors, loading, success }. Each input uses value={values.name} and onChange={e => setValues({...values, name: e.target.value})}. The submit handler calls the validate function, sets loading, awaits the API, then sets success. Render the success banner conditionally.
Add <input type="file" accept=".pdf,.doc,.docx,.png,.jpg" />. Use FormData for submission: const fd = new FormData(form). File inputs work natively with FormData — the file is included in the POST body automatically.