

Return Label Generator — Free Product Return Flow Widget
Return Label Generator · Tools · Plain HTML, CSS & JS · Live preview
Copy & paste
Source Code
<div class="rl-card">
  <form id="rlForm" class="rl-form">
    <h2>Start a return</h2>

    <div class="rl-field">
      <label for="rlReason">Reason for return</label>
      <select id="rlReason" required>
        <option value="" disabled selected>Select a reason…</option>
        <option>Doesn't fit</option>
        <option>Item damaged or defective</option>
        <option>Wrong item received</option>
        <option>No longer needed</option>
        <option>Better price found elsewhere</option>
        <option>Other</option>
      </select>
    </div>

    <div class="rl-field">
      <span class="rl-legend">Select items to return</span>
      <ul class="rl-items">
        <li class="rl-item">
          <label>
            <input type="checkbox" name="rlItem" value="Trail Runner Jacket" checked />
            <span class="rl-item-name">Trail Runner Jacket</span>
            <span class="rl-item-meta">Size M · Qty 1</span>
          </label>
        </li>
        <li class="rl-item">
          <label>
            <input type="checkbox" name="rlItem" value="Merino Base Layer" />
            <span class="rl-item-name">Merino Base Layer</span>
            <span class="rl-item-meta">Size M · Qty 2</span>
          </label>
        </li>
        <li class="rl-item">
          <label>
            <input type="checkbox" name="rlItem" value="Insulated Water Bottle" />
            <span class="rl-item-name">Insulated Water Bottle</span>
            <span class="rl-item-meta">Qty 1</span>
          </label>
        </li>
      </ul>
    </div>

    <p class="rl-error" id="rlError" hidden>Select a reason and at least one item to continue.</p>

    <button type="submit" class="rl-submit">Generate return label</button>
  </form>

  <div class="rl-confirm" id="rlConfirm" hidden>
    <div class="rl-check">✓</div>
    <h2>Your label is ready</h2>
    <p class="rl-tracking">Tracking number</p>
    <p class="rl-tracking-num" id="rlTrackingNum">1Z-000-000</p>
    <ol class="rl-next">
      <li>Print the label or show the QR code at a drop-off point.</li>
      <li>Pack the selected items securely in a box or bag.</li>
      <li>Drop off within 14 days — refunds process 3–5 days after receipt.</li>
    </ol>
    <button type="button" class="rl-restart" id="rlRestart">Start another return</button>
  </div>
</div>*{box-sizing:border-box}
body{font-family:system-ui,-apple-system,sans-serif;background:#0c0e14;color:#e9ecf5;padding:32px 16px;display:flex;justify-content:center;min-height:100vh;align-items:center}
.rl-card{width:100%;max-width:460px;background:#13151f;border:1px solid #262a3a;border-radius:16px;padding:26px}
.rl-form h2,.rl-confirm h2{font-size:19px;margin:0 0 18px}
.rl-field{margin-bottom:20px}
.rl-field label{display:block;font-size:13px;font-weight:600;color:#aab0c4;margin-bottom:8px}
.rl-legend{display:block;font-size:13px;font-weight:600;color:#aab0c4;margin-bottom:10px}
select{width:100%;background:#1b1e2b;border:1px solid #2c3145;color:#e9ecf5;padding:11px 12px;border-radius:10px;font-size:14px}
.rl-items{list-style:none;margin:0;padding:0;display:flex;flex-direction:column;gap:8px}
.rl-item label{display:flex;align-items:center;gap:10px;background:#1b1e2b;border:1px solid #2c3145;border-radius:10px;padding:11px 12px;cursor:pointer;font-weight:400}
.rl-item input{width:16px;height:16px;accent-color:#6f8dff;flex-shrink:0}
.rl-item-name{flex:1;font-size:13.5px;color:#e9ecf5}
.rl-item-meta{font-size:12px;color:#767f98}
.rl-error{color:#ff8a94;font-size:12.5px;margin:-6px 0 14px}
.rl-submit,.rl-restart{width:100%;background:#6f8dff;color:#0b0e1a;border:none;padding:13px;border-radius:10px;font-size:14px;font-weight:700;cursor:pointer}
.rl-submit:hover,.rl-restart:hover{background:#89a2ff}
.rl-confirm{text-align:center}
.rl-check{width:52px;height:52px;border-radius:50%;background:#173523;color:#5fe0a0;font-size:26px;display:flex;align-items:center;justify-content:center;margin:0 auto 14px}
.rl-tracking{font-size:12px;color:#8890a6;margin:6px 0 2px;text-transform:uppercase;letter-spacing:.06em}
.rl-tracking-num{font-size:20px;font-weight:800;letter-spacing:.04em;color:#c9d4ff;margin:0 0 18px;font-variant-numeric:tabular-nums}
.rl-next{text-align:left;margin:0 0 22px;padding-left:20px;color:#c4cadd;font-size:13.5px;line-height:1.9}const form = document.getElementById('rlForm');
const confirmView = document.getElementById('rlConfirm');
const errorEl = document.getElementById('rlError');
const reasonSelect = document.getElementById('rlReason');
const trackingNumEl = document.getElementById('rlTrackingNum');
const restartBtn = document.getElementById('rlRestart');
function generateTrackingNumber() {
const digits = Array.from({ length: 9 }, () => Math.floor(Math.random() * 10)).join('');
return '1Z' + digits + 'US';
}
form.addEventListener('submit', (e) => {
e.preventDefault();
const checkedItems = form.querySelectorAll('input[name="rlItem"]:checked');
const reasonValid = reasonSelect.value !== '';
if (!reasonValid || checkedItems.length === 0) {
errorEl.hidden = false;
return;
}
errorEl.hidden = true;
trackingNumEl.textContent = generateTrackingNumber();
form.hidden = true;
confirmView.hidden = false;
});
restartBtn.addEventListener('click', () => {
form.reset();
errorEl.hidden = true;
confirmView.hidden = true;
form.hidden = false;
});Extend with AI
Take This Snippet Further With AI
The AI prompt for this one is for Patreon supporters ($3 a month, 7 days free), along with a site with no ads. Supporters enter the passcode once and it is remembered in this browser.
What's included
Features
About this UI Snippet
Return Label Generator — A Two-Step Return Request Flow
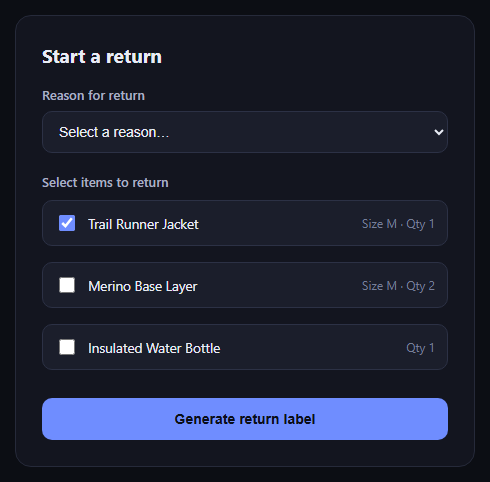
The return label generator is the flow e-commerce order pages use to let a customer pick a reason, select which items to send back, and get a shippable label — condensed to two states in one card instead of a multi-page wizard. This snippet builds it in plain HTML, CSS, and JavaScript.
Two states, one card
The widget has exactly two views: the form (#rlForm) and the confirmation (#rlConfirm). Submitting swaps their hidden attributes rather than routing to a new page, so the whole interaction stays in place — useful inside a modal or an order-details panel.
Reason plus itemized selection
A required <select> captures the reason for return, and a checkbox list — styled so the whole row is clickable, not just the tiny native checkbox — lets the customer choose exactly which items from the order to include, each showing its size/quantity metadata.
Validation before generating anything
The submit handler checks both that a reason is selected and that at least one item checkbox is checked before proceeding; if either is missing, an inline error message appears and no label is generated — a real (if simple) validation gate rather than a flow that always succeeds.
A mock tracking number, clearly a placeholder
generateTrackingNumber() builds a UPS-style code (1Z + nine random digits + US) purely for demo purposes. It's random on every submission, making clear in the code (and to anyone reading it) that this needs to be replaced with a real call to your shipping-label API.
Confirmation with real next steps
Once generated, the confirmation view shows a checkmark, the tracking number in large tabular numerals, and a numbered list of what happens next — print or show the QR code, pack the items, and the drop-off/refund timeline — so the customer knows what to do without hunting for a follow-up email.
Restart without a reload
A "Start another return" button calls form.reset() and flips the visibility back, so the demo (or a real multi-return flow) can be exercised repeatedly without a page refresh.
Customizing it
Wire the submit handler to a real shipping API, pull the item list from the actual order data, or add a shipping-method choice (drop-off vs. pickup). Pair it with order tracking timeline or checkbox tree for nested item selection.
Step by step
How to Use
- 1Paste HTML, CSS, and JSThe return form renders with sample order items.
- 2Pick a reasonThe select is required before submitting.
- 3Check the items to returnAt least one item must be selected.
- 4Click "Generate return label"Validation runs; errors show inline if incomplete.
- 5View the confirmationA mock tracking number and next steps appear.
- 6Click "Start another return"The form resets to try again.
Real-world uses
Common Use Cases
Got questions?
Frequently Asked Questions
No — generateTrackingNumber() produces a randomly formatted, UPS-style placeholder purely to demonstrate the confirmation state. Replace it with the tracking number your real shipping-label API returns before using this in production.
The submit handler checks that the reason select has a non-empty value and that at least one item checkbox is checked. If either check fails, an inline error message is shown and the confirmation view never appears.
Replace the static <li> markup with items rendered from your order data (name, size, quantity as the meta text), keeping the same input[name="rlItem"] pattern so the existing validation and submit logic keep working unchanged.
In the submit handler, after validation passes, call your API with the selected reason and item list, await the response, and use its returned tracking number and label URL in place of generateTrackingNumber() before showing the confirmation view.
Yes — add a third field to the form (e.g. a radio group for drop-off vs. pickup), include it in the validation check alongside reason and items, and pass its value along when you call your shipping API.