


Swiper Card Stack with Save and Skip — Free JS Snippet
Swiper Card Stack with Save and Skip Buttons · Mobile · Plain HTML, CSS & JS · Live preview
What's included
Features
About this UI Snippet
Swiper Card Stack with Save and Skip Buttons — HTML, CSS & JavaScript
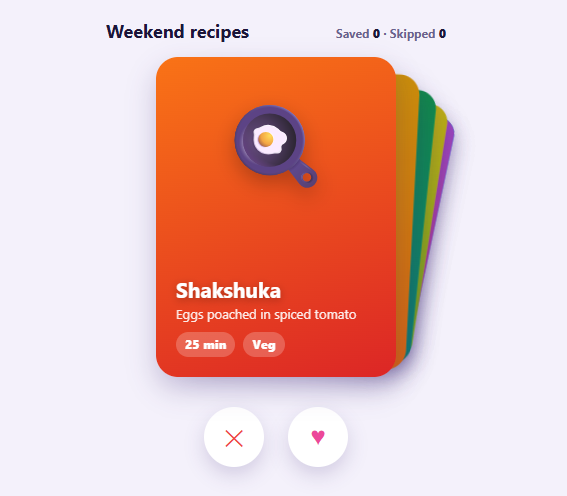
The card stack — a pile of cards you flick away one at a time — became a mobile design idiom because it turns a list into decisions. Each card asks one question, save or skip, and the physical gesture is faster and more engaging than tapping buttons on a list. Swiper includes it as the cards effect, so the stacking, rotation and depth shading do not need custom transforms.
effect: 'cards' changes how slides are arranged: instead of sitting side by side, they pile up, each one rotated slightly and offset so the edges of the cards beneath peek out. The cardsEffect object tunes it. perSlideOffset sets how many pixels each buried card shows, perSlideRotate sets the rotation per layer, rotate toggles the tilt while dragging, and slideShadows adds shading that makes the stack look three-dimensional. Sizing matters more than usual with this effect: the swiper container must have an explicit width and height, because the cards are absolutely positioned within it, and overflow needs to be visible for the fanned cards to show beyond the top card's edge.
What turns the visual into a tool is the interaction layer. The Save and Skip buttons call slideNext() and update the tally, giving the same result as swiping for people using a mouse or keyboard — and providing a non-gesture alternative, which accessibility guidance expects for any swipe interaction. Keyboard support is enabled so the arrow keys advance the stack. At the final card the snippet does not just stop; it swaps the stack for a "You've seen every recipe" panel with a Start over button that resets the counters and calls slideTo(0, 0), the second argument setting a zero-duration jump.
Deciding what a swipe means is the design question worth thinking about. In Swiper's cards effect, dragging a card away moves through the deck in the normal slider direction — drag left for the next card, right to go back — so swiping is browsing, not choosing. That is why the decision lives on the two buttons: Save and Skip each record a choice and then advance. Some apps map swipe direction to like and dislike, which requires a custom gesture layer that reads the drag direction and animates the card off screen itself; it is a bigger build than the cards effect alone, and it is worth deciding early whether you need it. The cards use gradients and emoji, so the demo needs no images.
Step by step
How to Use
- 1Drag the top cardDrag it to the left and release. It flies away and reveals the next card in the stack; drag right to bring one back.
- 2Use the buttonsPress the heart to save or the cross to skip. The tally at the top updates either way.
- 3Look at the stackCards beneath the top one peek out with a slight rotation, showing that more are waiting.
- 4Use the keyboardPress the left and right arrow keys to move through the deck.
- 5Reach the endAfter the last card, a completion panel appears with a Start over button.
Real-world uses
Common Use Cases
Got questions?
Frequently Asked Questions
Set effect: "cards", give the container an explicit width and height, and tune cardsEffect (perSlideOffset, perSlideRotate, rotate, slideShadows).
Not with the cards effect alone. Dragging moves through the deck in the normal slider direction, so record decisions with buttons, or build a custom gesture layer that reads the drag direction and animates the card away.
Yes. Gestures are not available to everyone, so provide buttons and keyboard controls that do the same thing.
Call swiper.slideTo(0, 0) to jump to the first card immediately and reset your own counters.
The cards effect needs overflow to be visible on the container, and the container must have a fixed size.
It is best used without loop, because the deck should end. Handle the final card with your own completion state.
Yes. Use the JSX, Vue, Angular or Tailwind export buttons on this page to convert the markup and styles. The behaviour comes from Swiper, so in a framework project install it with npm install swiper (its React and Vue components take the same options) instead of the CDN tag, use the Swiper and SwiperSlide components, or create it in useEffect / onMounted / ngAfterViewInit, and release it with destroy() when the component unmounts.
Build with AI
Build, Understand, Optimize, and Extend It With AI
Ask an AI assistant like Claude to add SAVE and NOPE stamps that fade in as you drag, an undo button for the last card, or load the deck from an API.
Prompt to recreate it
Copy this into your AI assistant of choice to build the effect from scratch, or as a jumping-off point for your own variant:
Build a swipeable card stack with Swiper 11 loaded from a CDN (bundle script and CSS).

Requirements:
- Use effect 'cards' with cardsEffect { perSlideOffset: 9, perSlideRotate: 3, rotate: true, slideShadows: true }, grabCursor and keyboard, and give the container a fixed 240x320 size with overflow visible.
- Render six recipe cards from an array using gradients and emoji.
- Add Save and Skip buttons that update a tally and call slideNext(); swiping just browses the deck.
- After the last card, hide the stack and show a completion panel with a Start over button that resets counters and calls slideTo(0, 0).
Want to tighten it up first? Run this prompt through the AI Prompt Studio to score it across 8 quality dimensions, catch anti-patterns, and tune the wording for Claude, ChatGPT, or Gemini before you paste it in.
Source Code
<div class="cs-wrap">
<div class="cs-head"><h3>Weekend recipes</h3><span class="cs-score" aria-live="polite">Saved <b id="csSaved">0</b> · Skipped <b id="csSkipped">0</b></span></div>
<div class="swiper cs-swiper" id="csSwiper">
<div class="swiper-wrapper" id="csSlides"></div>
</div>
<div class="cs-done" id="csDone" hidden>You’ve seen every recipe. <button type="button" id="csAgain">Start over</button></div>
<div class="cs-actions" id="csActions">
<button type="button" class="cs-skip" id="csSkip" aria-label="Skip this recipe">✕</button>
<button type="button" class="cs-save" id="csSave" aria-label="Save this recipe">♥</button>
</div>
</div>body { background: #f4f1fb; padding: 20px; font-family: system-ui, sans-serif; }
.cs-wrap { max-width: 340px; margin: 0 auto; }
.cs-head { display: flex; justify-content: space-between; align-items: baseline; margin-bottom: 14px; }
.cs-head h3 { margin: 0; font-size: 18px; color: #1b1638; }
.cs-score { font: 700 12px/1 system-ui, sans-serif; color: #6a628e; } .cs-score b { color: #1b1638; font-variant-numeric: tabular-nums; }
.cs-swiper { width: 240px; height: 320px; padding: 0; overflow: visible; }
.cs-swiper .swiper-slide { display: flex; flex-direction: column; justify-content: flex-end; border-radius: 22px; padding: 20px; color: #fff; font-size: 14px; overflow: hidden; box-shadow: 0 12px 28px rgba(50,30,110,.25); user-select: none; }
.cs-swiper .swiper-slide .cs-emoji { position: absolute; top: 28px; left: 0; right: 0; text-align: center; font-size: 84px; filter: drop-shadow(0 8px 10px rgba(0,0,0,.25)); }
.cs-swiper .swiper-slide h4 { margin: 0 0 4px; font-size: 21px; line-height: 1.15; text-shadow: 0 2px 8px rgba(0,0,0,.3); }
.cs-swiper .swiper-slide p { margin: 0; opacity: .9; font-size: 13px; }
.cs-swiper .swiper-slide .cs-meta { margin-top: 10px; display: flex; gap: 8px; font-size: 11.5px; font-weight: 800; letter-spacing: .04em; }
.cs-swiper .swiper-slide .cs-meta span { background: rgba(255,255,255,.22); padding: 5px 9px; border-radius: 999px; }
.cs-actions { display: flex; justify-content: center; gap: 24px; margin-top: 30px; }
.cs-actions button { width: 60px; height: 60px; border-radius: 50%; border: 0; font-size: 24px; cursor: pointer; background: #fff; box-shadow: 0 8px 20px rgba(50,30,110,.18); transition: transform .15s, box-shadow .15s; }
.cs-actions button:hover { transform: scale(1.08); } .cs-actions button:active { transform: scale(.94); }
.cs-skip { color: #ef4444; } .cs-save { color: #ec4899; }
.cs-actions button:focus-visible { outline: 3px solid #a78bfa; outline-offset: 3px; }
.cs-done { width: 240px; height: 320px; display: grid; place-content: center; text-align: center; gap: 14px; border: 2px dashed #cfc6ee; border-radius: 22px; color: #6a628e; font-weight: 700; line-height: 1.5; }
.cs-done[hidden] { display: none; }
.cs-done button { font: 800 13px/1 system-ui, sans-serif; color: #fff; background: #7c3aed; border: 0; border-radius: 999px; padding: 11px 18px; cursor: pointer; }const RECIPES = [
{ n: 'Shakshuka', d: 'Eggs poached in spiced tomato', t: '25 min', k: 'Veg', e: '🍳', bg: 'linear-gradient(160deg,#f97316,#dc2626)' },
{ n: 'Miso Ramen', d: 'Silky broth, soft egg, scallions', t: '40 min', k: 'Comfort', e: '🍜', bg: 'linear-gradient(160deg,#eab308,#f97316)' },
{ n: 'Green Curry', d: 'Coconut, basil and crisp veg', t: '30 min', k: 'Spicy', e: '🍛', bg: 'linear-gradient(160deg,#16a34a,#0d9488)' },
{ n: 'Lemon Pasta', d: 'Bright, buttery, five ingredients', t: '15 min', k: 'Quick', e: '🍝', bg: 'linear-gradient(160deg,#facc15,#84cc16)' },
{ n: 'Berry Pancakes', d: 'Fluffy stacks with warm compote', t: '20 min', k: 'Sweet', e: '🥞', bg: 'linear-gradient(160deg,#a855f7,#ec4899)' },
{ n: 'Poke Bowl', d: 'Marinated salmon over sushi rice', t: '20 min', k: 'Fresh', e: '🥗', bg: 'linear-gradient(160deg,#0ea5e9,#6366f1)' },
];
const slidesEl = document.getElementById('csSlides');
const saved = document.getElementById('csSaved'), skipped = document.getElementById('csSkipped');
const done = document.getElementById('csDone'), actions = document.getElementById('csActions'), stack = document.getElementById('csSwiper');
let nSaved = 0, nSkipped = 0;
slidesEl.innerHTML = RECIPES.map(function (r) {
return '<div class="swiper-slide" style="background:' + r.bg + '"><span class="cs-emoji" aria-hidden="true">' + r.e + '</span><h4>' + r.n + '</h4><p>' + r.d + '</p><div class="cs-meta"><span>' + r.t + '</span><span>' + r.k + '</span></div></div>';
}).join('');
const swiper = new Swiper('#csSwiper', {
effect: 'cards', // stacks the slides like a deck instead of laying them in a row
grabCursor: true,
cardsEffect: {
perSlideOffset: 9, // px each card behind the top one peeks out
perSlideRotate: 3, // degrees each card behind is rotated
rotate: true,
slideShadows: true,
},
keyboard: { enabled: true },
speed: 380,
});
function finish() {
stack.style.display = 'none'; actions.style.display = 'none'; done.hidden = false;
}
// Swiping the deck simply browses it; the two buttons (or Save / Skip via code) record a decision.
function act(save) {
if (save) saved.textContent = ++nSaved; else skipped.textContent = ++nSkipped;
if (swiper.activeIndex >= RECIPES.length - 1) { finish(); return; }
swiper.slideNext();
}
document.getElementById('csSave').addEventListener('click', function () { act(true); });
document.getElementById('csSkip').addEventListener('click', function () { act(false); });
document.getElementById('csAgain').addEventListener('click', function () {
nSaved = nSkipped = 0; saved.textContent = '0'; skipped.textContent = '0';
done.hidden = true; stack.style.display = ''; actions.style.display = '';
swiper.slideTo(0, 0);
});