


Camera UI — Free Phone Camera Viewfinder Snippet
Camera UI · Mobile · Plain HTML, CSS & JS · Live preview
Copy & paste
Source Code
<div class="cm-phone">
  <div class="cm-screen" id="cmScreen">
    <div class="cm-view" id="cmView">
      <div class="cm-grid"></div>
      <div class="cm-top">
        <button class="cm-flash" id="cmFlash"><span id="cmFlashIc">⚡</span></button>
        <span class="cm-timer">0:00</span>
        <button class="cm-hdr">HDR</button>
      </div>
      <div class="cm-focus" id="cmFocus"></div>
      <div class="cm-flashfx" id="cmFx"></div>
    </div>
    <div class="cm-controls">
      <div class="cm-modes" id="cmModes">
        <span>TIME-LAPSE</span><span>VIDEO</span><span class="on">PHOTO</span><span>PORTRAIT</span><span>PANO</span>
      </div>
      <div class="cm-bar">
        <div class="cm-thumb"></div>
        <button class="cm-shutter" id="cmShutter" aria-label="Take photo"><span></span></button>
        <button class="cm-flip" id="cmFlip" aria-label="Switch camera">
          <svg viewBox="0 0 24 24" width="22" fill="none" stroke="currentColor" stroke-width="2"><path d="M4 7h3l1.5-2h7L17 7h3v12H4z"/><path d="M9 13a3 3 0 0 1 6 0M15 13l1.5-1.5M15 13l-1.5-1.5"/></svg>
        </button>
      </div>
    </div>
  </div>
</div>*{box-sizing:border-box;margin:0;padding:0}
body{font-family:system-ui,-apple-system,sans-serif;background:#1e293b;display:flex;justify-content:center;align-items:center;min-height:100vh;padding:24px}
.cm-phone{width:280px;height:580px;background:#0b1220;border-radius:46px;padding:11px;box-shadow:0 30px 60px -20px rgba(0,0,0,.6),inset 0 0 0 2px #1e293b}
.cm-screen{width:100%;height:100%;border-radius:34px;overflow:hidden;background:#000;display:flex;flex-direction:column}
.cm-view{position:relative;flex:1;background:linear-gradient(160deg,#334155,#0f172a),radial-gradient(circle at 30% 30%,#475569,transparent);overflow:hidden}
.cm-grid{position:absolute;inset:0;background-image:linear-gradient(rgba(255,255,255,.18) 1px,transparent 1px),linear-gradient(90deg,rgba(255,255,255,.18) 1px,transparent 1px);background-size:33.33% 33.33%;opacity:.5}
.cm-top{position:relative;z-index:2;display:flex;align-items:center;justify-content:space-between;padding:16px 20px}
.cm-flash,.cm-hdr{background:rgba(0,0,0,.4);border:none;color:#fff;border-radius:8px;padding:6px 9px;font-size:12px;font-weight:700;cursor:pointer;font-family:inherit}
.cm-flash.on{background:#facc15;color:#0f172a}
.cm-timer{color:#fff;font-size:12px;font-weight:700;background:rgba(0,0,0,.4);padding:4px 10px;border-radius:99px}
.cm-focus{position:absolute;width:74px;height:74px;border:1.5px solid #facc15;border-radius:8px;opacity:0;transform:translate(-50%,-50%) scale(1.4);pointer-events:none;z-index:3}
.cm-focus.show{animation:cmFocus .9s ease forwards}
@keyframes cmFocus{0%{opacity:1;transform:translate(-50%,-50%) scale(1.4)}30%{transform:translate(-50%,-50%) scale(1)}100%{opacity:0;transform:translate(-50%,-50%) scale(1)}}
.cm-flashfx{position:absolute;inset:0;background:#fff;opacity:0;pointer-events:none;z-index:4}
.cm-flashfx.fire{animation:cmFx .35s ease}
@keyframes cmFx{0%{opacity:0}20%{opacity:.9}100%{opacity:0}}
.cm-controls{background:#000;padding:14px 0 22px}
.cm-modes{display:flex;justify-content:center;gap:18px;font-size:11px;font-weight:700;color:#64748b;margin-bottom:16px;overflow-x:auto;padding:0 20px;scrollbar-width:none;-ms-overflow-style:none}
.cm-modes::-webkit-scrollbar{display:none}
.cm-modes span{cursor:pointer;white-space:nowrap;transition:color .15s}
.cm-modes span.on{color:#facc15}
.cm-bar{display:flex;align-items:center;justify-content:space-between;padding:0 30px}
.cm-thumb{width:42px;height:42px;border-radius:9px;background:linear-gradient(135deg,#6366f1,#ec4899);border:2px solid rgba(255,255,255,.5)}
.cm-shutter{width:66px;height:66px;border-radius:50%;border:4px solid #fff;background:transparent;cursor:pointer;display:flex;align-items:center;justify-content:center;padding:0}
.cm-shutter span{width:54px;height:54px;border-radius:50%;background:#fff;transition:transform .12s}
.cm-shutter:active span{transform:scale(.86)}
.cm-flip{width:42px;height:42px;border-radius:50%;background:rgba(255,255,255,.16);border:none;color:#fff;cursor:pointer;display:flex;align-items:center;justify-content:center;transition:transform .4s}
.cm-flip.spin{transform:rotate(180deg)}var view = document.getElementById('cmView');
var focus = document.getElementById('cmFocus');
var fx = document.getElementById('cmFx');
// Tap anywhere on the viewfinder to drop a focus square.
view.addEventListener('pointerdown', function (e) {
if (e.target.closest('.cm-top')) return;
var r = view.getBoundingClientRect();
focus.style.left = (e.clientX - r.left) + 'px';
focus.style.top = (e.clientY - r.top) + 'px';
focus.classList.remove('show'); void focus.offsetWidth; focus.classList.add('show');
});
// Shutter: flash the screen white like a capture.
document.getElementById('cmShutter').addEventListener('click', function () {
fx.classList.remove('fire'); void fx.offsetWidth; fx.classList.add('fire');
});
var flash = document.getElementById('cmFlash');
flash.addEventListener('click', function () {
flash.classList.toggle('on');
document.getElementById('cmFlashIc').textContent = flash.classList.contains('on') ? '⚡' : '⚡';
});
var flip = document.getElementById('cmFlip');
flip.addEventListener('click', function () {
flip.classList.toggle('spin');
});
document.getElementById('cmModes').querySelectorAll('span').forEach(function (m) {
m.addEventListener('click', function () {
document.querySelectorAll('.cm-modes span').forEach(function (s) { s.classList.remove('on'); });
m.classList.add('on');
});
});Extend with AI
Take This Snippet Further With AI
The AI prompt for this one is for Patreon supporters ($3 a month), along with a site with no ads. Supporters enter the passcode once and it is remembered in this browser.
What's included
Features
About this UI Snippet
Camera UI — Mobile Viewfinder with Tap-to-Focus
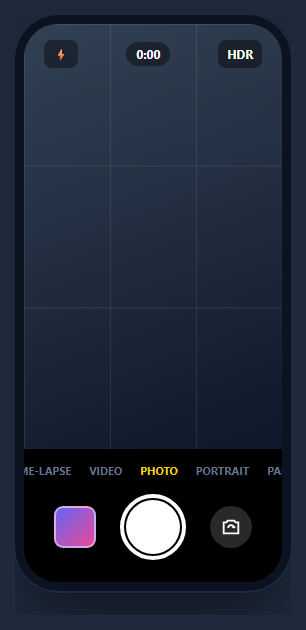
A camera UI is the viewfinder interface of a phone camera app — a live preview with a framing grid, top controls for flash and HDR, a mode selector, and the shutter, gallery, and flip-camera buttons. This snippet recreates a faithful one inside a CSS phone frame, with tap-to-focus, a capture flash, mode switching, and a camera-flip animation, in HTML, CSS, and vanilla JavaScript with no dependency.
Tap-to-focus anywhere
Tapping the viewfinder reads the pointer position relative to the preview and drops a yellow focus square there, animated with a cmFocus keyframe that overshoots then settles and fades — exactly the focus-lock affordance every camera app uses. The square is repositioned via left/top and the animation is restarted with the void offsetWidth reflow trick so it fires on every tap. Taps on the top controls are ignored so you don't focus when toggling flash.
The capture flash
Pressing the shutter fires a full-screen white overlay that quickly peaks and fades (cmFx keyframe), mimicking the brief flash of taking a photo, while the shutter button's inner disc scales down on press for tactile feedback. It's a convincing capture moment built from a single animated overlay.
The rule-of-thirds grid
The framing grid is drawn with two layered linear-gradient backgrounds sized at 33.33% — thin lines at each third — over the preview, the composition guide real cameras overlay. No SVG or extra elements; it's one element with a gradient.
Mode selector and flip
The mode strip (Photo, Video, Portrait, Pano, Time-lapse) is a horizontally-scrollable row where tapping moves a yellow .on highlight, the standard camera mode picker. The flip-camera button rotates 180° on tap via a CSS transition, suggesting the front/back switch. All interactions are class toggles routed through small handlers.
Reusing it
Replace the gradient preview with a real <video> element streaming getUserMedia, and the UI becomes a working camera. Wire the shutter to a canvas capture, the modes to real capture settings, and the flip to switching video tracks. Or keep it as a presentational mockup inside a phone mockup for app shots.
Step by step
How to Use
- 1Paste HTML, CSS, and JSA camera viewfinder renders inside a phone frame.
- 2Tap the previewA focus square drops where you tap and settles.
- 3Press the shutterA white flash fires like taking a photo.
- 4Switch modesTap Photo, Video, or Portrait to move the highlight.
- 5Toggle flash and flipFlash highlights and the flip button rotates.
- 6Make it liveSwap the preview for a getUserMedia video stream.
Real-world uses
Common Use Cases
getUserMedia stream, and showcase it in a bento grid of app screenshots.Got questions?
Frequently Asked Questions
A pointerdown on the viewfinder reads the tap position relative to the preview's bounding rect and sets the focus square's left and top to that point. The square plays a keyframe that overshoots, settles, and fades, restarted each time with the void offsetWidth reflow trick. Taps on the top control bar are ignored so toggling flash doesn't drop a focus square.
The shutter click fires a full-screen white overlay whose keyframe quickly rises to near-full opacity and fades back to zero, imitating a camera flash. The shutter button's inner disc also scales down on press for feedback. It's a single animated element, so there's no heavy effect or library involved.
It's one element with two layered linear-gradient backgrounds sized at 33.33%, producing thin lines at each third both horizontally and vertically — the rule-of-thirds composition guide. Using gradients means no SVG and no extra DOM, and you can change the line opacity or spacing with a couple of values.
Yes. Replace the gradient preview with a <video> element playing a getUserMedia stream, and the UI becomes functional. Wire the shutter to draw the current frame to a canvas, the modes to capture settings, and the flip button to switch between front and back video tracks. The controls are already in place.
Render the controls and modes from state, with the active mode and flash as flags. Handle tap-to-focus by setting focus coordinates in state and animating via a key change. For a real camera, attach a getUserMedia stream to a video ref in a mount effect. Tailwind styles the grid (arbitrary gradient utilities), shutter, and mode strip.